

How to Tune Your Music Maker Lap Harp
Like all real musical instruments, the Music Maker will eventually go out of tune (although it holds tune for an amazingly long time). Following are some tips that will help you tune your Music Maker lap harp easily, properly and accurately.
And if you ever have any questions, don’t forget that we’re just a phone call away: 805.837. 9405
First Off: An Important Tip
The adjustments needed to tune your Music Maker are VERY small. You don’t want to break a string by over-tightening the wire, so please make small changes at a time. A little bit of tightening goes a long way.
Also make sure that the tuner fits all the way down on the tuning pin. This will prevent it from stripping.
Common Question: Which Way do I Turn the Tuner?
To make a note lower in tone, turn counter-clockwise. This loosens the tuning pin.
To make a note higher in tone, turn clockwise. This tightens the tuning pin
Something That Makes Tuning So Much Easier!
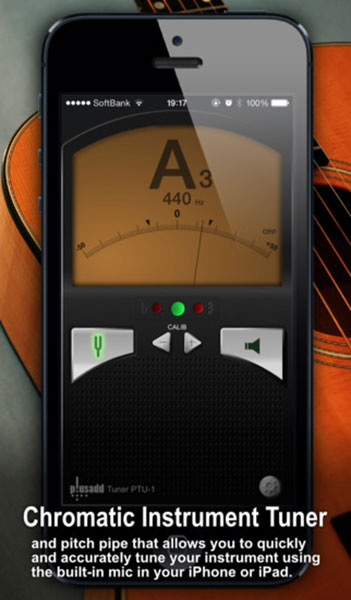
We recently found a FREE chromatic tuner that works with the iPhone or iPad. It’s so good that we use it to tune Music Makers at our warehouse, and we highly recommend it to you.
In the Apple Store search field type: Tuner Lite by Piascore. Then download the app.
When you first open the app, a tab will appear that gives you the option to purchase their professional level tuner. Don’t do it…you just want the regular, free version.
This is what the app looks like when it’s installed on your iPhone or iPad.

When you press the pitchfork icon, it will light up, meaning you are ready to tune. This mode “reads” the note when you pluck it, and tells you which note the string is tuned to. You then make adjustments as required.
The bottom string of the Music Maker lap harp should tuned to G. (All the notes are identified on the Tuning Card, which comes with every Music Maker lap harp. If you have lost yours, you can download it by clicking here.
How It Works:
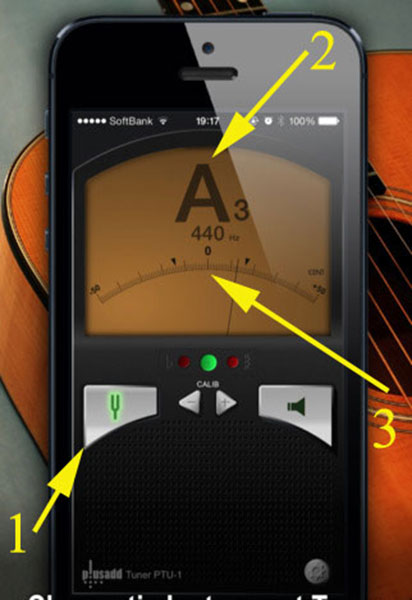
Pluck the bottom string and see which note the tuner says your string is currently tuned to. Your tuner will indicate something like this:

#1 points to the pitchfork icon, which puts the tuner in “read” mode.
#2 is where the note plucked is indicated (in this case, an A). By comparing this readout with your tuning card, you will know whether to make the note higher or lower.
From bottom to top, the Music Maker’s strings follow this sequence: G A B C D E F# (or, F sharp) G A B C D E F# (again) and G.
Thus, if the readout indicates an A, and you need a G…then you need to loosen the tuning pin.
Conversely, if the readout indicated a C, and you wanted an E or an F#, you would need to tighten the tuning pin.
#3 arrow indicates the pitch of that note in megahurtz. It’s where the fine tuning takes place.
Note the “O” below the note. This indicates perfect tune.
Also note the two triangles, one to each side of the “0” Everything to the left is a little (or a lot) flat. Everything to the right is a little (or a lot) sharp.
The space between the two triangles is where the needle should point.
Hitting the “0” is perfect pitch, but most people won’t be able to tell if it’s a little bit off. Anything outside of the two triangle range, however, should be adjusted.
Example: In the photo above note the position of the needle, which is to the right of the “0.” But it’s within the two triangles, which is good enough.
The only tricky bit is the F-sharp. A Music Maker lap harp has two. This is not an F where the needle lies outside the right triangle. That is just a sharp F…not an F sharp. (We realize this sounds somewhat odd, but that’s music for you.)
Keep tightening the tuning pin a little bit and you will see the F on the screen change to an F#, indicating a true F sharp. You should then adjust the tuning pin so that the needle on the tuner lies between the two triangles.
Enjoy!